If your question is not addressed below, please contact us through our support form and we'll get back to you shortly.
- What is one-click virtualization in IDrive Mirror?
- How do I perform one-click virtualization of my computers?
- How quickly can I virtualize a machine with IDrive Mirror?
- How is IDrive Mirror optimized for virtual instances?
- How many virtual machines can I create?
- What are the points that have to be taken into consideration while virtualizing a machine?
- If I virtualize a machine, will the original backup be affected?
- How do I build a custom virtual instance of my computers?
- Can I perform power operations on the virtual machine?
- What are the network source options available for creating virtual instances?
- How do I test if the virtual machine from my backup boots successfully without creating any network conflicts?
- How do I test restore via virtualization without causing conflict with the production machine?
- Why am I being prompted to activate my Windows license for the new virtual instance?
- Can I retain the static IP configurations on a virtualized machine?
- How do I access resources within my site's network from a virtual instance on the IDrive cloud?
- Are full/incremental image backups in IDrive Mirror dependent on each other?
- My computer is failing to virtualize. How can I recover my data?
- Can I perform backups and restores in a virtual instance created from a recovery point?
One-click virtualization in IDrive Mirror enables you to quickly set up a virtual instance of your computers on the cloud. This one-click process enables you to instantly create a virtual instance using default configurations and the latest backed up data of the computer you want to virtualize. The virtual instance can take the place of your primary machine, ensuring seamless business continuity and minimizing downtime during a disaster.
To create a virtual instance with a click,
- Login to your IDrive Mirror account.
- Go to Dashboard.
- Click Virtualization corresponding to the computer that you want to virtualize.
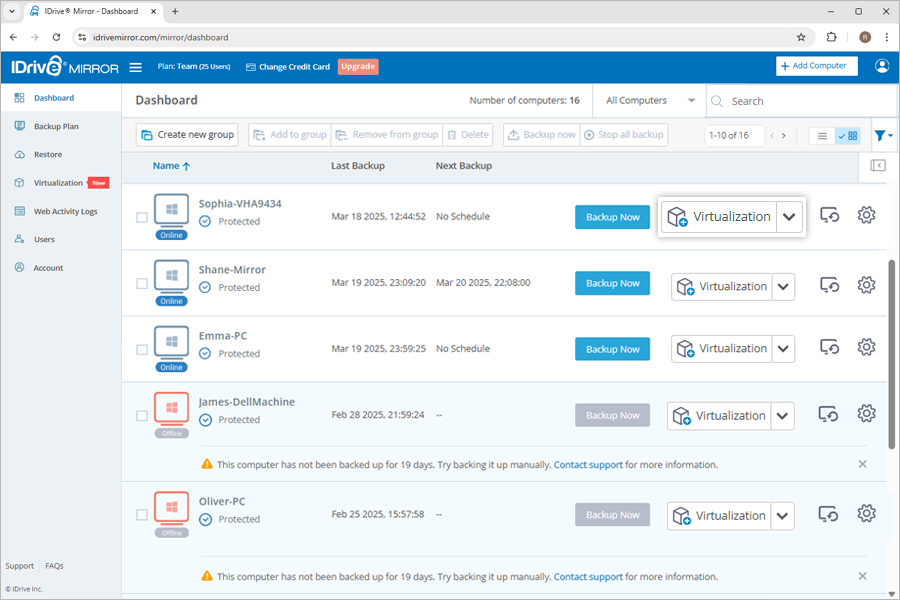
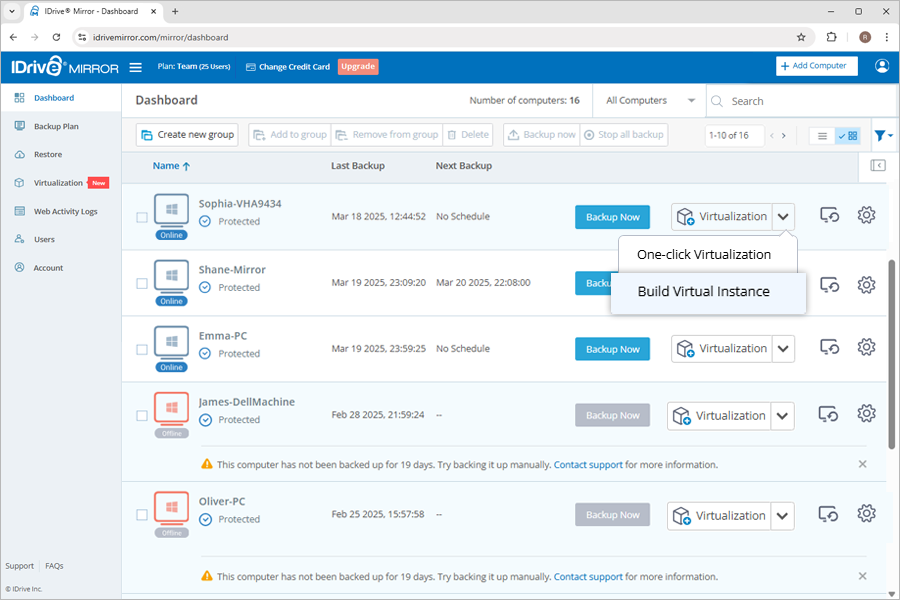
Alternatively, you can click One-click Virtualization from the drop-down menu.
The virtual instance will be instantly created using the last backup of the selected computer. By default, it will be allocated with 2 GB RAM and 2 processors.
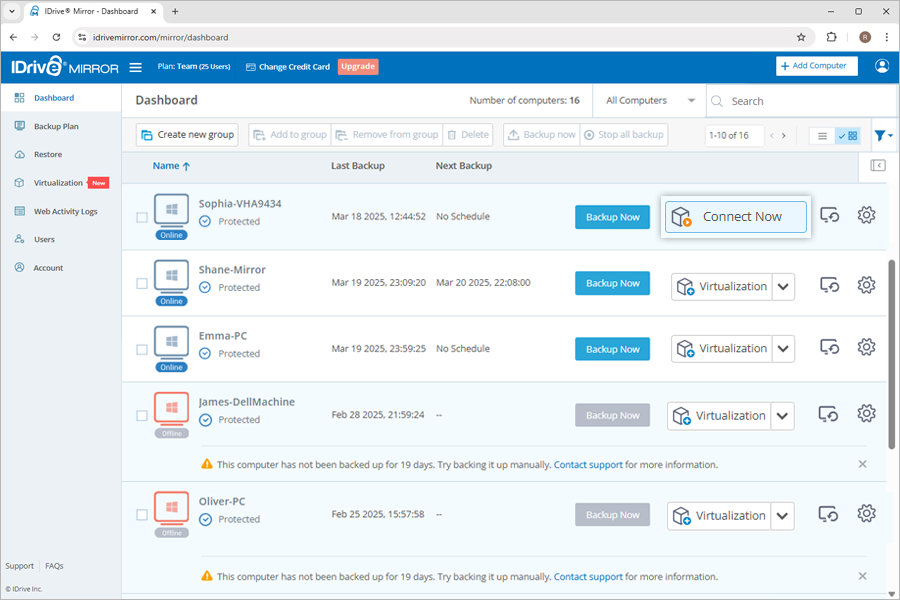
To access the virtual instance in the future, click Connect Now.
IDrive Mirror uses the KVM hypervisor for better virtualization and high performance. It allows you to instantly virtualize a machine, ensuring seamless business continuity.
IDrive Mirror employs storage devices with NVMe accelerated caching and computing resources, delivering optimized storage and performance of the virtual instances.
With IDrive Mirror, you can create up to four cloud virtual instances. Each instance is created from a separate data backup, and only one instance can be created per computer. You can allocate up to 16 GB cumulatively for the RAM configuration of the four virtual instances. This solution is optimized to use minimal memory and CPU resources, allowing multiple virtual machines to operate efficiently.
The following points must be taken into consideration while virtualizing a machine.
- Virtual instances hosted on IDrive Mirror have outbound internet access only.
- Any changes made to data using the virtual instance cannot be restored back to the primary machine.
- Access to the virtual instance is secured via an encrypted VNC-based web client.
- Virtual instances are automatically powered off after 14 days, but they remain mounted with data preserved. To resume usage, you must manually power them on again.
- Each virtual machine is automatically deleted 21 days after creation.
No, virtualizing a machine does not impact its backed-up data. IDrive Mirror's file system allows for instant cloning of the original backup. Since the virtual machine is created using the cloned data, the original backup remains unaffected.
To create a custom virtual instance of your computer,
- Login to your IDrive Mirror account.
- Go to Virtualization.
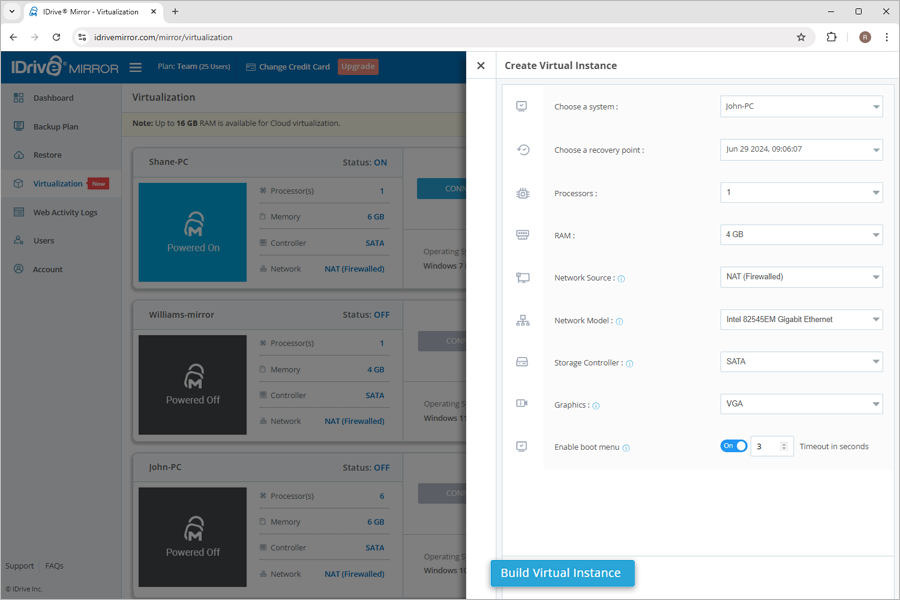
- Click Build Virtual Instance. The Cloud virtualization slider appears.
- Under Computer, select the required computer from the Choose a system dropdown.
- Choose a recovery point.
- Select the number of processors for the virtual machine and allocate the required memory for the virtual machine in the RAM field, taking into account the memory available for cloud virtualization.
- Select a network source and the appropriate network model.
- Choose the required storage controller for the virtual machine (SATA is recommended) and select a graphics option from the Graphics dropdown.
- Click Build Virtual Instance. A task to create the virtual instance will be created. Once the task is completed, the virtual instance will be built and ready to access.
- Click Connect Now to access the virtual instance.
Note: When a machine with dynamic disks is virtualized, the created virtual instance will have basic disks with randomly assigned drive letters. You may have to sign in to the VM and change the drive letter associations as necessary.
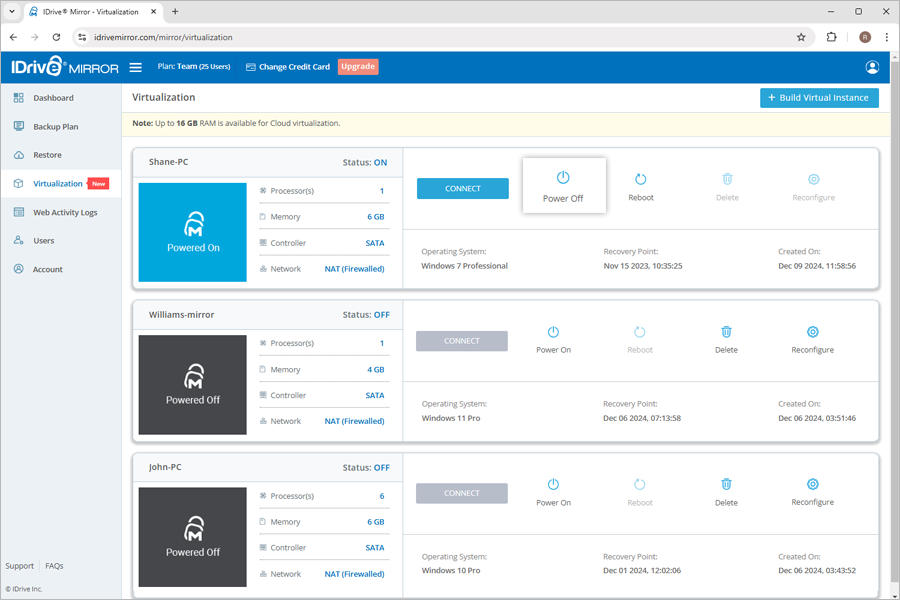
Yes, you can perform power operations on the virtual machine.
To perform power operations,
- Login to your IDrive Mirror account.
- Go to Virtualization.
- Click Connect corresponding to any machine to power on the machine.
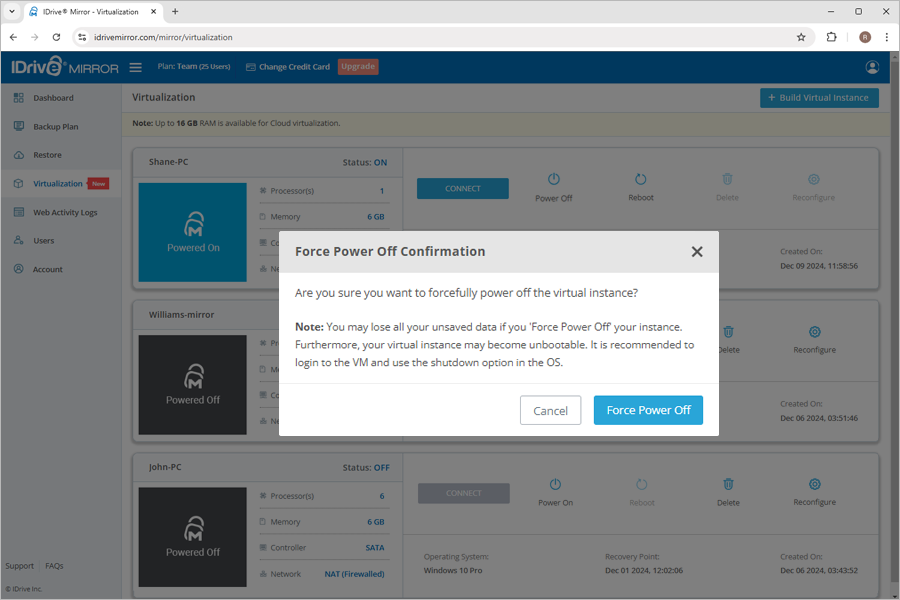
- Click
 to forcefully power off the machine. You will be prompted with a confirmation window.
- Click Power Off.
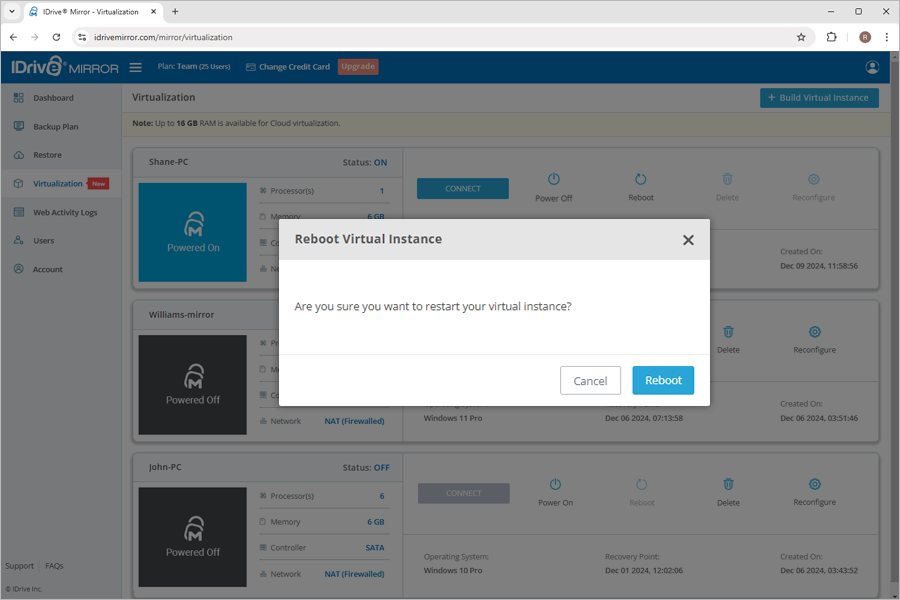
To restart a virtual machine,
- Click
 next to the corresponding machine.
 - You will be prompted with a confirmation.

- Click Reboot.
Configure the connection of the new virtual instance to other devices and locations on the network by selecting a suitable network source.
The network source options available for creating a virtual instance are:
Disconnected
Isolate a virtual instance from all networks using the 'Disconnected' option. The virtual machine will not have any LAN or internet access.
NAT (Firewalled)
Create an isolated virtual network with internet access using the NAT (Firewalled) option — Network Address Translation mode. This will permit the virtual instance to have outbound internet access without causing any conflict with the production instance of the machine.
How do I test if the virtual machine from my backup boots successfully without creating any network conflicts?
You can test the success of a VM boot by configuring the 'Disconnected' or 'NAT (firewalled)' network source.
Create the test virtual instance on ‘Disconnected’ or ‘NAT (Firewalled)’ mode to avoid conflict with the production machine. Also, IDrive Mirror may backup data from either one of the machines as a part of its schedule, thereby causing inconsistencies in the backup. To learn about the network source options, refer to FAQ on available network source options for creating virtual instances.
Windows licensing links your purchased product key to the hardware configuration of the machine. In the case of a virtualized machine, the hardware for the virtualized machine is provided by the hypervisor which is different from the physical hardware and this may prompt Windows to re-activate your license.
The solution depends on the type of your Windows license.
Solution for retail license: Windows allows retail licenses to be transferred to another machine. You can simply enter the product key on the new machine and reactivate the Windows license.
Note: Retail licenses can only be installed on one machine at any particular time. Avoid activating Windows on multiple computers with the same product key.
Solution for OEM license: OEM license is non-transferrable and links your purchased product key to the motherboard of the original physical computer. To secure license activation for a restored machine, you will need to contact your OEM-license provider. IDrive Mirror cannot assist you with third-party licensing issues.
Your machine's static IP address is set on your ethernet network adapter. When you create a virtual instance of a machine, the NIC hardware will be different from the original and will reset the IP to DHCP. If your work environment is static-IP dependent, you will need to manually configure the network settings after restore.
The virtual instances on IDrive Mirror will have outbound internet network connectivity. You can use a suitable VPN solution within your site's network and configure the VPN client on the virtual instance to bring it inside your network. We recommend using either of the two methods detailed below.
Method 1: Use a self-hosted OpenVPN access server
Self-host the OpenVPN Access Server within your network to which the cloud virtual instance can connect and get access to the internal network resources.
Prerequisite:
The OpenVPN Access Server is available as a virtual appliance and as a software package. The software package needs a spare Linux machine (Ubuntu 18) for manual deployment. We recommend using a pre-built virtual appliance instead which is quick and easy. The download for the virtual appliance method is available for both Hyper-V and VMware ESXi platforms in which you can choose the feasible one.
The following steps assume you have a Hyper-V server where you can self-host the OpenVPN access servers' virtual appliance, by downloading the required virtual disk file and attaching it to a Generation 1 VM.
Download the virtual appliance
- Signup for a free account with OpenVPN
- Click Get Access Server.
- Under the As a virtual appliance section, click Microsoft Hyper-V.
- Download and configure the virtual appliance as a Generation 1 VM in your Hyper-V server.
- Ensure the VM is connected to a virtual switch in Hyper-V, configured with the External connection type so the VM has access to the physical network.
- When the virtual appliance starts, log in to its root account using the username and password (Username: root, Password: openvpnas).
You will be prompted with a few configuration steps. It is recommended to go with the default settings and use the default ports suggested.
Note: This free version of OpenVPN allows 2 licenses. You can connect only 2 cloud virtual machines via VPN at a time.
Set up port forwarding in your router to enable access to the OpenVPN access from the cloud VM
- Log in to your network router.
- Navigate to the section where you can enable virtual servers or define port forwarding rules.
- Enable port forwarding to forward external traffic to the static local LAN IP of the OpenVPN access server with the following default ports: 443 (TCP), 943 (TCP), and 1194 (UDP).
Once the port forwarding is set up, your OpenVPN access server's web UI is accessible from anywhere for administration via the WAN/Public IP:
https://<your_wan_ip>:943/admin
Steps on Mirror VM
- Create a VM with the networking option set to NAT (Firewalled), so that the VM has outbound internet access.
- Open a browser in your cloud VM and download the OpenVPN client:
https://<your_wan_ip>:943. - The downloaded client is preconfigured with the necessary connection details and authentication to reach your OpenVPN access server.
- Install the OpenVPN client and launch the tray icon to start the VPN connection.
Your cloud VM now has access to your site's internal network resources through this VPN channel.
Method 2: Use your existing VPN solution
This method is suitable if you already have a hardware or software-based VPN solution setup within your network (router, switch, Cloud VPN software product, etc.). You can configure the cloud virtual instance to connect to your existing VPN infrastructure and get access to its local network resources.
No, IDrive Mirror does not follow the traditional method where each recovery point in an incremental image backup depends on the previous ones. Instead, every recovery point created is completely independent. This means data can be restored from any available recovery point, even if an earlier full or incremental image backup is missing. As a result, you can create a virtual machine using any recovery point without relying on the integrity of a backup chain.
Virtualization may fail due to various reasons, including disk configuration issues, driver incompatibility with IDrive Mirror's hypervisor platform, firmware type, or multiple OS boot loaders.
If your computer fails to virtualize, contact IDrive Mirror support as the first step. This will allow us to diagnose the issue and provide a resolution based on your specific case.
In the meantime, you can recover your data using the following methods:
Currently, IDrive Mirror does not support additional backups or restores within a virtual instance created from a recovery point.
This functionality will be available in future releases.